
Solar Wall Light Factory Guide to Durable Outdoor Lighting Solutions
2026-08-23
Most outdoor solar lights fade within a season—cracked housings, dead batteries, and dim output. But a factory built around durability changes everything. In this guide, we're pulling back the curtain on what SRS does differently to engineer solar wall lights that survive real weather and real years. If you've ever wondered why some fixtures last a decade while others die by winter, keep reading.
Factory Tour Red Flags: What Separates Durable Solar Wall Lights from Fragile Imitations
Walking a production floor, you can spot the difference before a single unit hits the test bench. Durable solar wall lights start with anodized aluminum or thick polycarbonate housings—tap the casing and listen for a dull, solid thud rather than a thin plasticky rattle. Watch how workers handle the lens: if it's snapped into place with a rubber gasket seated cleanly, that's a sign of weather sealing done right. Fragile imitations skip the gasket or use brittle clips that crack within a season.
Another red flag shows up at the soldering station. Factories serious about longevity use automated pick-and-place machines and then inspect joints under magnification, reflowing any dull or pitted connections. If you see hand-soldered wires with uneven blobs and leftover flux, expect early failures from thermal cycling. The battery compartment tells a similar story—durable designs separate the cell from the LED driver with thermal padding, while cheap builds cram everything together and rely on a thin foam sticker for insulation.
Pay attention to the test line, not just the assembly line. Reliable manufacturers run each fixture through a rain-spray chamber, voltage drop test, and a 48-hour burn-in cycle before packing. If the "test" consists of a quick flicker check or a batch sample that leaves most units untested, walk away. It's the difference between a light that survives five winters and one that starts flickering after the first heavy storm.
Why Powder-Coated Aluminum Beats Cheap Plastic After One Rainy Season
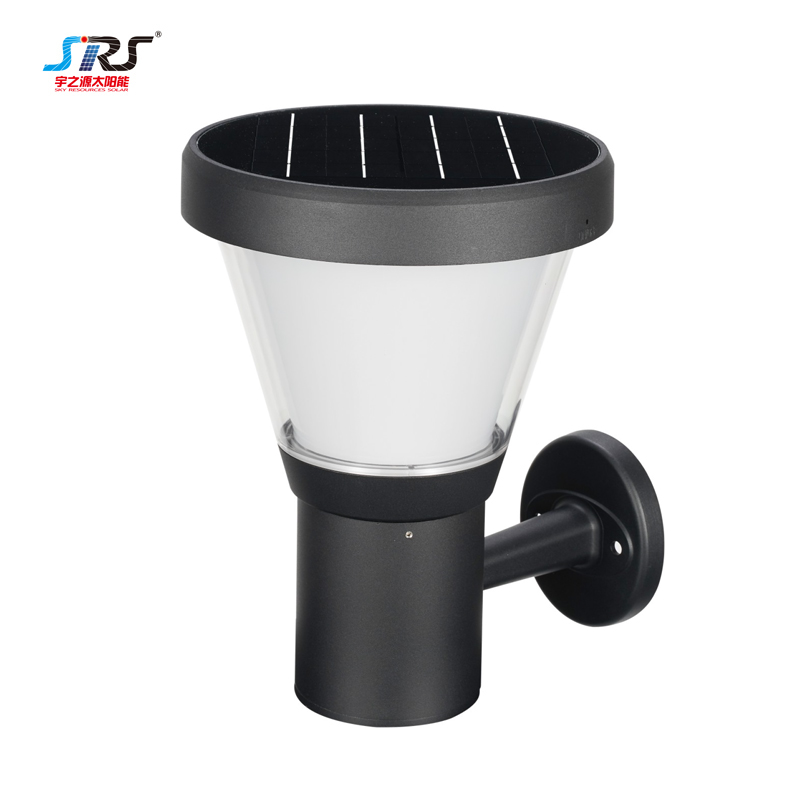
Pull a cheap plastic bracket or housing off the wall after six months of real weather and the story writes itself. The color has chalked out to a sad, uneven gray. Hairline cracks have started at the screw holes, and the edges feel brittle enough to snap with one thumb. Now set a powder-coated aluminum part next to it—same wall, same rain, same sun. The finish still has its depth. The edges are clean. Nothing flexes when you press on it. That side-by-side isn't a sales pitch; it's what actually happens after one wet season.
The difference comes down to how each material handles moisture and UV. Cheap plastic absorbs water at the surface, swells slightly, then dries out again—over and over until the polymer chains break down. Powder coating on aluminum works the opposite way. The coating is cured into a dense, non-porous shell that sheds water before it can sit. Underneath, the aluminum doesn't rust, doesn't warp, and doesn't care if the humidity hits ninety percent for a month straight. A single rainy season is enough to expose every shortcut in a plastic part; the powder-coated aluminum just keeps looking like it did on day one.
And it's not only about surviving. After the rain stops, most plastic parts start a slow slide toward replacement—fading, cracking, loosening at the mounting points. Powder-coated aluminum skips that whole cycle. You don't have to repaint it, shim it, or tighten it back into shape. You mount it, you forget it, and the next time you notice it is when you happen to glance up and realize it still looks new. That's the real payoff: not having to think about the part again.
Battery Compartments That Actually Stay Dry: A Field Guide for Buyers
Plenty of gear gets marketed as weatherproof, yet the battery compartment remains the one place where water sneaks in and ruins everything. The telltale sign is that crusty blue-white residue on the terminals, but by the time you notice it, the damage is already done. A truly dry compartment starts with a gasket that sits fully in its groove, not a flimsy foam strip that peels away after a few months of use.
Look closely at how the lid mates with the body. A good design uses multiple latching points or a threaded ring that spreads pressure evenly, so the seal doesn’t gap at the corners. Some compartments have tiny drainage channels or a recessed lip that guides water away before it can pool near the contacts. If the manufacturer shows a close-up of the seal in their product photos, that's usually a positive sign, but you still need to verify the material is silicone or EPDM rather than cheap neoprene.
Before buying, check user reviews specifically for mentions of moisture after use in rain or salt spray. A compartment that stays dry in a quick splash test might still fail when the housing flexes under load. Also pay attention to how the batteries sit relative to the opening; if the contacts are at the bottom and the door opens upward, any water that does get in will drain toward the electronics instead of away from them. Small design choices like that separate a compartment that survives real conditions from one that only looks sealed.
The Overlooked Role of Solar Panel Angle in Year-Round Performance
Most installation guides still treat panel tilt as a one-time decision based on latitude alone. That shortcut ignores how much the sun's path shifts between summer and winter, and how a fixed angle quietly sacrifices output for months at a time. A roof that looks perfect in June may be leaving a large share of winter generation on the table, especially in higher latitudes where the low sun struggles to reach steeply tilted panels.
Angle also affects more than direct irradiance. Panels set too flat collect dust and pollen faster, while steep arrays let rain do the cleaning. Snow slides off high-tilt panels on its own, but shallow angles can hold a frozen layer for days after a storm. In humid or coastal climates, a slight increase in tilt can improve airflow behind the module and lower cell temperature enough to matter over a full year.
Adjustable mounts are often dismissed as too complex, but even a two-position seasonal change — steeper in winter, shallower in summer — can add several percent to annual yield in many regions. The real obstacle is not hardware; it is the habit of treating angle as a set-and-forget parameter. Builders and homeowners who revisit tilt, even twice a year, often recover the extra cost within a few seasons without any change to panel count or inverter size.
How Smart Motion Sensors Extend Battery Life Without Sacrificing Brightness
Most motion-activated lights follow a simple rule: when no one is around, they drop to a faint standby glow or shut off entirely. Smart motion sensors take a different path. They don't just detect presence; they read the rhythm of the room. By learning which hours are truly active and which are dead zones, the sensor can keep leds at full output during high-traffic times and dial back only when the space has been empty long enough to matter. The result is a light that still floods the driveway or hallway when you step into it, but isn't burning watts at 3 a.m. for no reason.
The trick lies in how the sensor handles those brief moments of stillness. Older models would either shut off too early, forcing you to wave an arm, or stay on too long out of caution. A smart sensor watches for the difference between a pause and a departure. If you're sitting at a desk or loading a shelf, it holds brightness steady. Only when the pattern clearly shows an exit does it ramp down. This fine-grained control means the fixture rarely needs a reset or a manual override, so the battery isn't wasted on false restarts or prolonged high-current draws.
Another angle is the sensor's own power budget. Instead of constantly polling at full sensitivity, it fluctuates its sample rate based on context. Near dusk or in a busy corridor, it stays sharp. Deep night or a locked storage room? It cuts its own consumption to a tenth, waking only when a larger heat shift or vibration breaks the quiet. Because the light output remains bright the instant a real trigger occurs, users never notice the sensor's background frugality. The outcome is a battery that lasts months longer, often years, while the light itself never feels dimmed or hesitant.
Questions to Ask Before You Commit to a Bulk Order of Outdoor Wall Lights
Before you sign off on hundreds of fixtures, dig into the wet-rated versus damp-rated distinction. A wall light mounted under a covered porch might only need damp protection, but anything exposed to direct rain or sprinkler spray must carry a wet location listing. Ask the supplier for the exact IP rating, not just a vague “weatherproof” claim. IP65 means it can handle low-pressure jets from any direction, while IP44 only copes with splashes. If the housing is aluminum, confirm whether it’s powder-coated or anodized—bare aluminum will pit within a season near salt air.
Next, pin down the real lumen output and beam spread. Many bulk quotes list wattage instead of actual light delivered, which tells you nothing about performance. Request the photometric file or at least a measured lumen count after the diffuser, not raw LED output. For walkway and entry lighting, a 120-degree beam usually works better than a narrow 30-degree spotlight unless you're highlighting texture. Also ask about color temperature consistency across the batch—cheap drivers can produce a visible green or pink shift from one fixture to the next.
Finally, clarify what the warranty actually covers in a commercial setting. Some manufacturers void coverage if fixtures are installed within five miles of salt water or if they're run on a timer that cycles more than ten times daily. Ask for a sample unit before the full order arrives, then install it for two weeks and check for moisture intrusion, lens yellowing, and paint adhesion. If the vendor hesitates to send a sample or won't match the batch to that exact production run, walk away.
FAQ
Prioritize an aluminum housing over plastic—extruded or die-cast aluminum sheds heat and won't get brittle in direct sun. Check that the lens is UV-stabilized polycarbonate, and make sure every seam has a silicone gasket. An IP65 rating is the floor; IP66 or IP67 is better if you get driving rain. Also ask whether the mounting bracket is stainless steel, since rust there can cause the whole fixture to drop.
Ask for their accelerated aging reports, not just a spec sheet. A factory that does 85°C/85% humidity testing and thermal cycling on the battery pack is far more credible. If you can visit, look at their burn-in rack—if units have been running for hundreds of hours with no dead LEDs, that's a good sign. Salt spray test results matter for coastal installs.
Almost always it's the battery or a bad seal. Cheap 18650 cells without a protection board fail fast in heat, and once a cell swells, it pushes against the housing and cracks the seal. Poorly laminated solar panels let moisture creep in and corrode the busbars. An undersized charge controller can also cook the battery by pushing too much current on sunny days.
Lithium iron phosphate (LiFePO4) beats standard lithium-ion for outdoor heat—it handles higher temperatures without degrading and lasts two to three times as many cycles. Match the battery capacity to the solar panel output so it fully charges even on short winter days. Also ensure the battery compartment has some air gap or heat sink, not just a sealed plastic box.
You can, but choose a model with a high-efficiency monocrystalline panel and a low-current LED circuit. A separate solar panel on a short cable often works better than an integrated one, because you can angle it toward the sun while keeping the light where you need it. Avoid deep shade entirely—no battery can make up for a panel that never sees direct light.
It's the difference between a light that fades in a year and one that stays bright. Constant-current drivers keep each LED at a safe temperature and prevent thermal runaway. Ask the factory if they run thermal imaging on the PCB; if they can't show you that, assume the LEDs are being overdriven and will lose 30% brightness within 18 months.
Wipe the panel with a damp cloth every couple of months—dust alone can cut charging by 20%. Check the silicone gasket for cracks before rainy season, and tighten the mounting screws once a year. If the light starts dimming earlier than usual, the battery likely needs replacement; LiFePO4 packs usually last 3–5 years, so plan for that.
The LEDs can run 50,000 hours or more, and a metal housing may last a decade, but the battery is the weak link. Expect 3–5 years from a quality LiFePO4 pack before capacity drops below 70%. After that, replacing the battery can give the fixture another full life cycle—so choose a model where the battery is user-replaceable instead of glued in.
Conclusion
Walking through a factory that builds solar wall lights tells you more than any spec sheet. Look for red flags like uneven powder coating, exposed wiring, or battery trays that snap shut with a flimsy click. Durable units use powder-coated aluminum housings—after a single rainy season, cheap plastic warps, fades, and lets moisture creep inside. A well-designed battery compartment matters just as much: seals should be gasketed, latches tight, and drainage paths angled away from contacts. If the solar panel sits flat on top with no tilt adjustment, winter performance drops sharply. The best factories set panels at a fixed 15 to 30 degrees or offer adjustable brackets to catch low-angle sun.
Smart motion sensors do more than trigger the light—they manage power. Good sensors use passive infrared with adjustable sensitivity and a short boost mode, keeping lumens high only when someone approaches. That stretches battery cycles through cloudy weeks without leaving the path dark. Before committing to a bulk order, ask how the factory tests waterproofing, what battery cells they source, and whether they can provide a tear-down sample. A supplier who hesitates on those questions usually cuts corners where it matters. The difference between a light that lasts five years and one that dies by autumn is rarely visible in a photo—it is in the hinges, coatings, and seals you check up close.
Contact Us
Contact Person: kitty
Email: [email protected]
Tel/WhatsApp: +8618676039824
Website: https://www.srssolargroup.com/